

Recording Purchase under GST in Tally Prime
Table of Contents
Purchase of goods or services is one of major event in a business. Purchase can be either on cash or on credit. Many transactions are involved to complete the purchase process can be, items bought, payments made, goods returned, and so on. Tally Prime, enables to record all these transactions.
Record purchase bills: You need to record a purchase when a purchase is made either on cash bill or invoice. If it is credit purchase, record it by using the supplier ledger. A cash purchase is recorded using cash a/c. Tally Prime handles all such needs of recording purchases.
Record additional charges, discounts, and free items: Purchase transactions may include additional expenses, such as transportation charges, insurances, and taxes. Even discount issued by the supplier or free samples given also needs to be recorded in your purchases. Similarly, if you have received free items or samples from your supplier, all of these can be recorded and tracked in Tally Prime.
Viewing Reports: Tally Prime, can track all the purchase bills using different reports, such as Purchase Register, Day Book.
Types of Purchases
Intrastate Purchase
When you make a purchase within your state or in other words when both sellers and purchaser are in the same state then it is called intra state purchase.
In case of intra state purchase both CGST and SGST are applicable in equal proportions.
Interstate Purchases
When both seller and purchaser are in two different states then purchase is categorized as interstate purchase.
In interstate purchase GST levied is IGST (Integrated GST) by the centre. which is later distributed equally between centre and consumer state.
Recording Intra State Purchase in Tally prime
Goods can be purchased on cash or credit, the procedure for recording both types of purchase voucher differs a bit.
Credit Purchase:
All the credit purchases are recorded under purchase voucher as
Dr Purchase A/c
Cr Sundry Creditor
Cash Purchase:
Cash purchases can be recorded in two ways. one as Purchase voucher type and other Payment voucher type. Entries for both remains the same.
Dr Purchase A/c
Cr Cash A/c or Bank A/c
Here, you can differentiate that in case of cash purchases, cash or bank is credited and the supplier ledger for credit purchases.
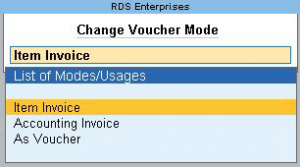
Item Invoice
To record purchase of items you can select Item Invoice mode by pressing Control+h which allows to toggle between Item invoice, Accounting invoice and as voucher.
Accounting Invoice
When you wish to record purchase without selecting items, then select invoice mode as Accounting Invoice.
As Voucher
TallyPrime also provides the flexibility to use these invoice modes interchangeably for recording purchases. In addition to this You can also enter purchases as voucher as well.
Open the purchase voucher screen.
- Gateway of Tally > Vouchers > press F9 (Purchase).
Alternatively, press Alt+G (Go To) > Create Voucher > press F9 (Purchase). - Press Ctrl+H (Change Mode) to select the required voucher mode (Item Invoice, in this case).
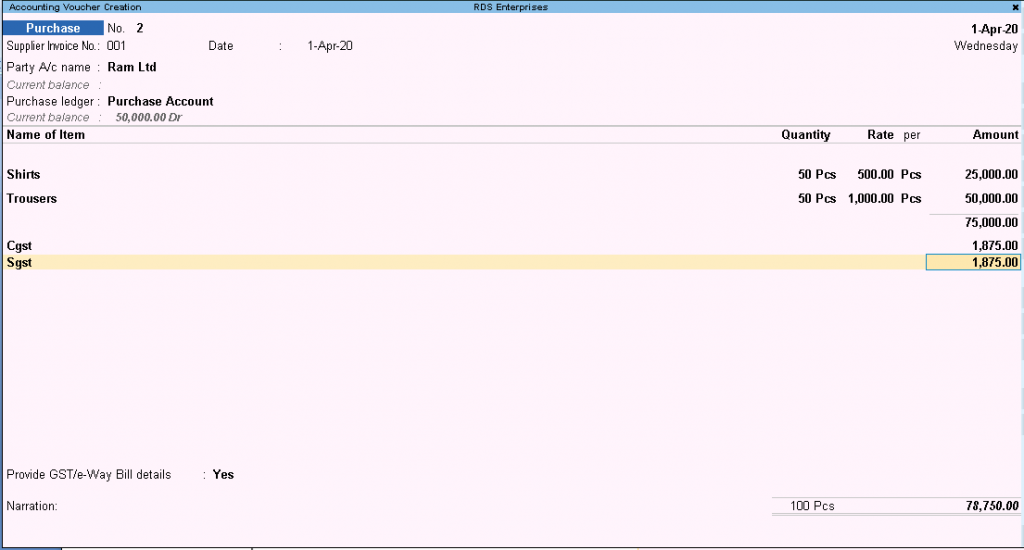
- Specify the supplier details.
- Supplier Invoice No. and Date: as per sales bill
- Party A/c name: Select Cash or Bank for cash purchases. For credit purchases, select the supplier ledger.
- Party Details: Enter the supplier’s name and address.
- Purchase ledger: Select the purchase ledger
- Provide the stock item details as per transaction. In Item Invoice, select the stock item, enter the Quantity and Rate, Amount will be auto calculated.
- Select GST ledgers CGST and SGST one by one as Tax amount will be automatically calculated by Tally prime as per GST tax slab.
- Select additional ledgers, like transportation charges, insurance, or discount, if any.
- Accept the screen by pressing Ctrl+A to save.

Purchase under GST
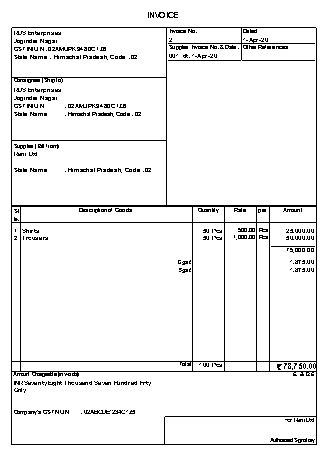
- Print the invoice.
- Press Alt+P (Print) > press Enter on Current.
- Press I (Preview) to check the invoice before printing, if needed.
- Press P (Print) to print.
The following is a sample preview screen of the purchase invoice.
Record Expense or Fixed Assets in Purchase
Expenses or Fixed Assets purchases can also be recorded under purchase voucher, just change the voucher mode to As Voucher and select the required Expense or Fixed Assets ledger.
In the purchase voucher screen
- Press Ctrl+H (Change Mode) > select Accounting Invoice.
- Under Particulars, select the Expense or Fixed Assets ledger.
- Provide other details in the voucher and, as always, press Ctrl+A to save it.
Specify Separate Supplier and Consignee Details
In certain cases, you may want your supplier to deliver goods to a location different from your billing address. To do this enter the delivery address as the consignee details to record a purchase transaction in TallyPrime.
- In the Party Details screen of purchase invoice having the Supplier (Bill from) section, press F12 (Configure) > set Provide separate Buyer and Consignee details to Yes.
Henceforth, you can add both the consignee and supplier details in every purchase invoice, until you change the option in F12 (Configure) of the invoice. - Enter the Consignee and SupplierWhat you see on the screen can vary based on your choices. Press F12 (Configure) to change the options.
- Accept the screen. As always, you can press Ctrl+A to save.
When this invoice is printed, the consignee name and address where the buyer wants the delivery of goods will be printed.
Purchase of Items with Discounts
To receive discounts while making purchases is normal. It can be on the total item amount or on each amount separately. Using TallyPrime, you can record all such discounts. You can also record the item-level discounts as either indirect incomes or rate discounts.
Purchase with discount on total item amount
If you have received discounts on items from your supplier, say on purchase of items worth Rs. 10,000 or more, you can account for such discounts while recording your purchase invoice.
- In the purchase invoice, after you have selected the stock items, press Enter twice to skip one line.
Alternatively, press Enter > Spacebar > and select End of List.
This takes you to the next line in the screen where you can now select the discount ledger. In Accounting Invoice, select the discount ledger. - Provide details of the discount.
- Select the ledger for discount created under Indirect Incomes, say Discount Received.
- Enter the discount percentage (%) under Rate as a negative number (in minus, for example, -12%). TallyPrime applies the discount to the total item amount and displays the discount amount against the selected discount ledger. Alternatively, you can enter the Amount.
- Enter the remaining details and accept the screen. As always, you can press Ctrl+A to save.
TallyPrime calculates the GST Tax by subtracting the discount from the total amount for the items.
If your supplier calculated the discount after including additional charges, such as transportation, press F12 (Configure) > set Calculate Tax on Current Subtotal to Yes.
Henceforth, when you select the discount ledger, the discount will be applied to the total amount after including any additional charges, until you change the option in F12 (Configure) of the invoice.
GST Purchase with trade discount
Based on your business terms with your supplier, you may get discounts on certain items depending on the quantity or supply. To record a purchase with such trade discounts, you can show the discount percentage against the quantity of the item. You can also enter the discount percentage or amount for each item, and book the total discount as indirect income in your purchase invoice.
Enter discount percentage against each item – without using ledger account
- Press F11 (Features) > set Use Discount column in invoices to Yes. If you do not see this option, set Show more feature to Yes. Henceforth, you will see the Disc % column in every purchase invoice.
- In the purchase invoice, after you have provided the Quantity and Rate, enter Disc % for the selected item.
The Amount for the given quantity of the stock item is displayed after deducting the discount, without showing any change in the Rate. - Enter the remaining details and accept the screen. As always, you can press Ctrl+A to save.
The discounted item amount appears against each item.
Enter discount percentage and amount on item rates – using ledger account
- In the purchase invoice, press F12 (Configure) > set Provide Cash/Trade Discount to Yes.
If you do not see this option, set Show more configurations to Yes. If the option does not appear, press F11 (Features) > enable the statutory options applicable for your business. - After you have entered the Amount of the stock item, in the Discount field, enter the discount percentage that you have received for that item.
This automatically calculates the discount and displays the amount in the next field.
Alternatively, press Enter to leave the first field blank and enter the discount amount in the next field. - Select the discount ledger created under Indirect Incomes.
Ensure that in the discount ledger, the option Type of ledger is set to Discount.Enter the remaining details and accept the screen. As always, you can press Ctrl+A to save.
Note: The total discount amount appears againt discount ledger is the sum of the discounts displayed under each stock item.
Purchase with Free items
When you make a purchase, you might receive a few items for free from the supplier. For example, if you had placed an order for 12 pcs of an item, the supplier might have billed you for only 10 pcs and given the remaining 2 pcs without any additional cost. Alternatively, the supplier might have billed you for all 12 pcs, and sent 2 additional pcs of the same item or a different item as samples. In TallyPrime, you can account for such purchases in different ways during voucher entry.
Record for free items using Actual and Billed quantities
- Press F11 (Features) > set Use separate Actual and Billed Quantity columns in invoices to Yes.
If you do not see this option, set Show more features to Yes.
Henceforth, you will see the Actual and Billed columns under the Quantity column in every purchase invoice. - Actual: Enter the quantity purchased from the supplier, say 12 nos of the item.
- Billed: Enter the quantity for which you will pay the supplier, say 10 nos of the same item.
- Enter the remaining details and accept the screen. As always, you can press Ctrl+A to save.
The total amount calculated is based on the billed quantity; however, the items supplied to you are based on the actual quantity, which includes the free items.
Record for free items using zero-valued transaction
- Gateway of Tally > Alter > Voucher Type > select Purchase > and press Enter.
Alternatively, press Alt+G (Go To) > Alter Master >Voucher Type > select Purchase > and press Enter. - Set the option Allow zero-valued transactions to Yes.
Henceforth, you can enter stock items without entering the Rate (zero value) in every purchase invoice. - In the purchase invoice, provide details of the items – Quantity, Rate, and Amount – that you have been billed for.
- Select the same item again or a different item, as supplied to you, and enter the Quantity. Leave the Rate and Amount fields blank.
- Enter the remaining details and accept the screen. As always, you can press Ctrl+A to save.
The invoice generated displays the billed items with the Amount details, along with the total quantity received from the supplier.
Purchase of Fixed Assets
If you are purchasing fixed assets (for example, furniture) which you do not trade in, you can record such purchases in TallyPrime.
- Open the purchase voucher screen, and press Ctrl+H (Change Mode) to select the required voucher mode (Accounting Invoice, in this case).
- Specify the supplier details.
- Provide the fixed asset details.
- Select the ledger grouped under Fixed Accounts.
- Enter the amount.Provide Narration, if needed, and accept the screen. As always, you can press Ctrl+A to save.
This value will appear in the Balance Sheet.
You can record the same transaction in voucher mode, as per your business needs.
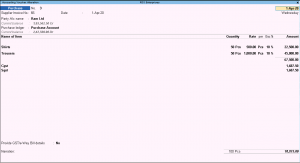
- Open the purchase voucher screen, and press Ctrl+H (Change Mode) to select the required voucher mode (As Voucher, in this case).
- Credit the party or cash/bank ledger.
- Debit the fixed asset ledger.
- Accept the screen. As always, you can press Ctrl+A to save.
Track Stock Item Cost in Purchases
When multiple stock items are purchased and the expense is charged as a lump-sum amount, you may want to allocate such expenses to each stock item. In TallyPrime, you can automate the allocation of such expenses to stock item on a predefined basis.
Note: The additional costs reflect only in the stock value. It will not affect the accounts.
Enable expense ledger to track additional costs of purchase
- Enable the purchase voucher type to track the additional costs on purchase.
- Gateway of Tally > Alter > Voucher Type> type or select Purchase > and press Enter.
Alternatively, press Alt+G (Go To) > Alter Master >Voucher Type > select Purchase > and press Enter. - Set the option Track Additional Costs for Purchases to Yes.
- Press Ctrl+A to save.
- Gateway of Tally > Alter > Voucher Type> type or select Purchase > and press Enter.
- Enable the expense ledger to track the additional costs on purchase.
- In the expense ledger, press F12 (Configure) > set Select Appropriation Methods to allocate Additional Costs to Yes.
- In the expense ledger select the Method of appropriation in purchase invoice as Appropriate by Qty.
- Press Ctrl+A to save the expense ledger.
The additional costs/expenses incurred can be allocated to each item based on Quantity or Value.
Track additional costs in purchase invoice
You can automate the allocation of expenses to each stock item in the invoice mode. If you want to manually allocate the expenses, you can record the transaction in voucher mode.
- In the purchase invoice (press Ctrl+H and select Item Invoice mode), select the required stock items.
- Select the additional expenses ledger and enter the amount.
- Press Ctrl+A to save.
- Press Page Up to view the same transaction in alteration mode.
- Press Ctrl+H (Change Mode) and select the voucher mode (As Voucher in this case). The purchase voucher with additional expenses apportioned automatically, appears as shown below:You can manually enter the percentage of allocation or change the amount as needed. The same details will appear in Stock Summary.
- Press Alt+G (Go To) > type or select Stock Summary.
Alternatively, Gateway of Tally > Stock Summary.
Purchase Reports
Every business need real-time updates on their day-to-day purchases to keep track of the stock availability. Tally prime provides the tracking of purchases day-wise, month-wise, or for any period. These reports help in making informed decisions and provides insights on the overall purchase, returns if any, payment dues, and so on. Two most common reports are day book and purchase register.
Day Book
Day book contains all the transactions on a day-to-day basis. You can filter this report to check all the purchase transactions made on a particular day.
- Press Alt+G (Go To) > type or select Day Book.
Alternatively, Gateway of Tally > Display More Reports >Day Book. By default, this report displays all the transactions as of the Current Date displayed on the Gateway of Tally - To view the purchases recorded on any given day:
- Press F2 (Date) to change the date.
- Press F4 (Voucher Type) > select Purchase.
This report lists all the purchase transactions recorded on the selected date.
Purchase Register
Purchase Register offers a comprehensive view of the month-wise purchases done in your business. It can be drilled down to voucher level. In addition to it Purchase register can be configured to show purchases for different periods.
Press Alt+G (Go To) > type or select Purchase Register.
Alternatively, Gateway of Tally > Display More Reports > Account Books > Purchase Register.
Scroll Up or Down and press Enter to view purchase vouchers recorded in the selected month.
Summary: Recording purchase under GST, cash discount, trade discount, purchase of free samples has been has been covered in this topic. The remaining will be added in the coming chapters. Please like share and comment the post.
TallyPrime installation setup files can be downloaded from the Tally Solutions website.
Similar Topics: TallyPrime Download and Installation
You May Also Like: How to create and run java Program Elements of C Language
Redmi note 9 pro https://amzn.to/3Ah7IvU
Pingback: How to Create Multiple GST Interstate Sales Invoice in Tally Prime
Pingback: Accounting Fundamentals for Beginners 2026 Guide with Examples
Pingback: Top 25 Tally Prime Shortcut Keys Every Accountant Must Know