

TallyPrime Installation and Download
Table of Contents
TallyPrime is a all new business management software for SMEs by Tally Solutions. It is a best business management software to manage transactions related to accounting, inventory, banking, taxation, and payroll etc.
TallyPrime Installation is as simple as 1,2,3…… Before jumping in to installation, let’s have a look on its features.
Features of TallyPrime
TallyPrime is a major shift from Tally.ERP9. The most prominent features of TallyPrime are:
- Simplified Interface
- Insightful Business Reports
- Accounting & Invoicing
- GST / Taxation
- Inventory Management
- Cash Flow Management
- Multitasking Capabilities
- Go To feature
- Access business data Online
- Secured Data
- Payroll Management
System Requirements for TallyPrime
TallyPrime can be installed in a system running minimum windows7 64- bit version. You need administrator privilege for successful installation. To use multilingual features, the operating system must supports multiple languages.
The minimum hardware and software requirements for a Client-Server system and a standalone computer are as under. This is valid for both TallyPrime Silver and Gold Editions.
| Particulars | Recommended Configuration |
| Processor | Dual Core, Core2 Duo, Core i3, Core i5, Core i7 equivalent, or above with 1.8 GHz 64-bit(x64) architecture processor |
| RAM | 4 GB or more |
| Hard Disk | 150 MB free space to install the application |
| Monitor Resolution | 1366 × 768 |
| Operating System | Microsoft Windows 7/8.1/10 with 64-bit editions, Windows Server 2008 R2, or above |
| MS Office software | 64-bit editions of MS Office software such as Excel, Word, and so on |
How to Download and Install TallyPrime
TallyPrime setup files can be downloaded from the Tally Solutions website. Installation of TallyPrime is quite simple and same for all the editions.
- To Download the TallyPrime setup files.
- Visit https://tallysolutions.com/download/.
- Click Download.
- Select the folder where you want to save the setup.exe file.
- Click Save.
- To Install TallyPrime.
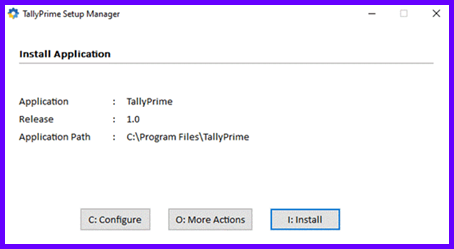
- Double-click Setup.exe.
- Then click Install.

TallyPrime Download and Installation - Use Configure button if you don’t want to install TallyPrime in the default folder, By default, the application will be installed at C:\Program Files\TallyPrime.
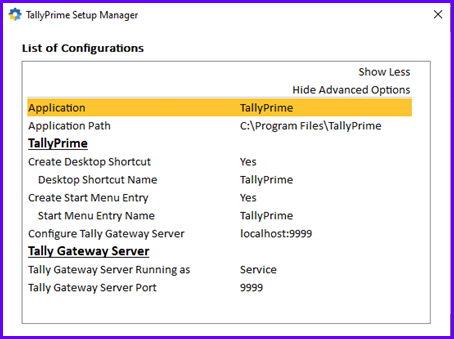
- Click Configure.
- Double-click Application Path.
- Click on browse and switch to the path as needed.

TallyPrime Download and Installation
Note: Existing Tally.ERP9 users should install TallyPrime in a different folder. This way they can use both the products simultaneously.
- Close the List of Configurations
- Now Click on Install and the application gets installed, and the “Installation Successful” window will open.
- Click on Start TallyPrime to launch TallyPrime.
You can activate the license, and thereafter, you can start using TallyPrime.
How to activate TallyPrime License
TallyPrime comes with two types of Licensing
- Silver License – Single PC
- Gold License – Multiple PCs
For Silver License activation, simply activate the license on one computer. However, if you have a multiuser/Gold License, then first activate the license on one computer on the Local Area Network. Thereafter, rest of the PCs can be configured using the using the same license.
Activate New License
- When you start your TallyPrime by double clicking its icon then Welcome to TallyPrimescreen appears as under.

TallyPrime Download and Installation - Then Click Activate New License.
- To activate TallyPrime license, you need three things(Which are provided by TallyPrime Reseller)

- Serial Number
- Activation Key
- Administrator e-mail ID.
Note: The e-mail ID entered here will be linked to your TallyPrime account, and used for all future communication and licensing activities.
- Press Enter to proceed. The Unlock License screen appears.
- Enter the Unlock Key sent to your e-mail ID.
Note: If you have not received the unlock key, then press F2 (Get Unlock Key).
- Press Enter to unlock your license. Once your license is unlocked, the following message appears.
Once the license is activated, then you can start using TallyPrime for business transactions by creating your first Company.
TallyPrime Educational Version
TallyPrime can be tried before you decide to buy. It’s Educational version is free to try or learn . In this case, you can try all features in the product. However, there will be one restriction. The voucher dates in the Educational version are limited to 1, 2 and 31.
- Start your TallyPrime. The Welcome to TallyPrime screen appears.
- Click Try It For Free.
You can start using TallyPrime in Educational mode. Once you do that, you will observe that the window title is in dark green colour and shows EDU under the product name.
Migration from Tally.ERP 9 to TallyPrime
If you are an existing user of Tally.ERP 9 and if your TSS is active, then you can upgrade to TallyPrime. Install TallyPrime in a new folder. Once the license is configured, you can continue to use both TallyPrime and Tally.ERP 9 as well.
Once you update the license, you can open the Company in TallyPrime. This step will do a single-click migration of the data to make it work in TallyPrime.
Update/Configure using Tally.ERP 9 License
Start your TallyPrime.
- Click Reactivate Existing License.
Note: If you have installed TallyPrime in a different folder, then you can use both the products simultaneously, if needed.
- Enter the NET ID and password. The List of Licenses screen appears.
- Select the required Tally.ERP 9 license.Once the license is configured to the Tally Gateway Server, you will receive the following message.
- Select Yes to activate. The List of Companies screen appears.
- Select the required Company to continue.
Your TallyPrime application License is now registered. You can start using TallyPrime for business transactions.
Migrate to TallyPrime
- Open the required Company. You will be prompted to do a migration.
- Click Migrate.Thereafter, the Company will be migrated, and will remain open for you to continue as well.
Now you can continue to record business transactions in TallyPrime.
Update TallyPrime Installation to Lattest Release
Information on the latest releases of TallyPrime is easily available now. Once a new TallyPrime release is launched, if you have a valid TSS(Tally Software Services), then you will see a notification alert. Based on your needs, you can choose to upgrade to the latest release of TallyPrime.
However, if you have not upgraded to the latest release and have a valid TSS, then you will see a red dot adjacent to F1 (Help). The red dot indicates that the latest release for TallyPrime is available. You can upgrade to the same as per your convenience.
- Press F1(Help) > Upgrade. The following screen appears.
- Select the latest available release and press Enter. For example, select TallyPrime Release 1.1.Thereafter, a message appears prompting you to confirm download and installation of the latest release.
- Select Yes. A message appears confirming that TallyPrime will start with administrator rights.
- Press Enterto continue.
- On successful update to the latest release, select Start TallyPrime.Then, the latest release of TallyPrime will open.
Thereafter, you can open your company data and start recording transactions using the latest release.
[sg_popup id=”256″ event=”inherit”][/sg_popup]
TallyPrime Installation can be a really simple process. Once you download it, TallyPrime installation can be completed within a couple of minutes. Please, Share and Comment the topic.
You may also like this:
Object Oriented Programming Features Dynamic Memory Allocation in C Where to write JavaScript Code What is New in HTML5
Pingback: Charts of Accounts in Tally Prime - DigitalSanjiv
Pingback: Learning Account Groups in Tally Prime - DigitalSanjiv
Pingback: Recording Purchase under GST and discount - DigitalSanjiv