
GST Invoice Format in Tally.ERP9
Table of Contents
Tally.ERP9 is a comprehensive accounting software which is industry standard GST ready. The transactions which involve in the sales of goods or services need to be entered in GST Invoice Format. Since GST Invoice has to be handed over to customer hence it is mandatory for a business to get GST Invoice printed.
The sales of goods in a business may be a simple cash sales, or even a credit sales. For each sales transaction, you will need to keep a record of the items that you sold, the payment that you received, goods returned, and so on.
The GST invoice also serves as a proof of the purchase made by the buyer. Using Tally.ERP 9, you can do all of these and also, you can view reports any time you need to understand the sales performance of your business.
Generate sales bills : Record a GST invoice when the buyer makes an instant payment using cash or any other mode, like cheque or credit/debit card. If it is sales on credit, record a credit sale by including the party name.
Print GST invoices : For each sales transaction, the buyer will require a copy of the GST invoice. At times, you may want to include specific item or service details when you print the GST invoice, such as configuration of a laptop, motor capacity of an appliance, warranty offered on the item, and so on. Also, the buyer may ask for the goods to be delivered to a his premises. Therefore, you will need to print the delivery address separately on the GST invoice. Tally.ERP 9 handles all such GST invoicing needs and more.
Record additional charges, discounts, and free items : Your sales transaction may also include additional expenses, such as transportation charges, insurance, discounts, and taxes. Depending on your business practice, you may need to apply discounts on each item or on the total GST invoice amount.
Similarly, if you give free items to your buyers at times, or send samples to a customer, all of these can be recorded and tracked in Tally.ERP 9.
Reports : You can track all the sales bills recorded in Tally.ERP 9 using different reports, such as Sales Register, Day Book, and so on. You can view your sales across different periods, filter the data for specific details, configure the reports to view more sales-related details and more.
Accounting Invoice for Goods or Services
Whether it’s a cash sales or credit sales, the procedure in Tally.ERP 9 remains similar. The only difference is that you will select cash or bank for cash sales and party ledger for credit sales.
You can record sales of items using the Item Invoice mode and create bills without items using the Accounting Invoice mode.
Tally.ERP 9 also provides the flexibility to use these invoice modes interchangeably for recording sales. As per your business practice, you can print all the invoices with the necessary details.
- Open the sales voucher screen.
- Gateway of Tally > Accounting Vouchers > F8 (Sales) .
- Press Alt + I and select the invoice mode as per your business needs select between Accounting Invoice / Item Invoice here.
- Specify the buyer details.
- Party A/c Name : Select Cash or Bank for cash sales. For credit sales, select the party name.
- Party Details : If you need Dispatch , Order , or Buyer details to be part of your invoice, provide the following details:
o Dispatch & Order Details : You can print these details in the invoice for the buyer’s reference. If you already have a Delivery Note or a Sales Order, the Delivery Note Number and the Order Number are pre-filled.
o Buyer’s Details : In the case of cash sales, specify the buyer’s details as needed in the printed invoice.
Note: Your regular customers may need specific details, such as address with landmark, alternative contact number, and so on, to appear in the invoices they receive. In such cases, you can create party ledgers with the required details, such as Address, State, and so on. In the Buyers field, press Alt + M (Party List) and select the required ledger.
As always, you can press Ctrl + A to save and proceed.
- Specify the accounting ledger to allocate the stock items.
- For Accounting Invoice , you do not need an accounting ledger since no stock items are involved for allocation.
- Provide stock item or service details.
- For Accounting Invoice , select the service ledger and enter the Amount .
- Provide Narration , if needed, and accept the screen. As always, you can press Ctrl + A to save.
The contents available on screen can vary based on your choices. Press F12 (Configure) to change the options and F11 (Features) to enable or disable features.
- To print the invoice, press Alt + P (Print) and press Enter .
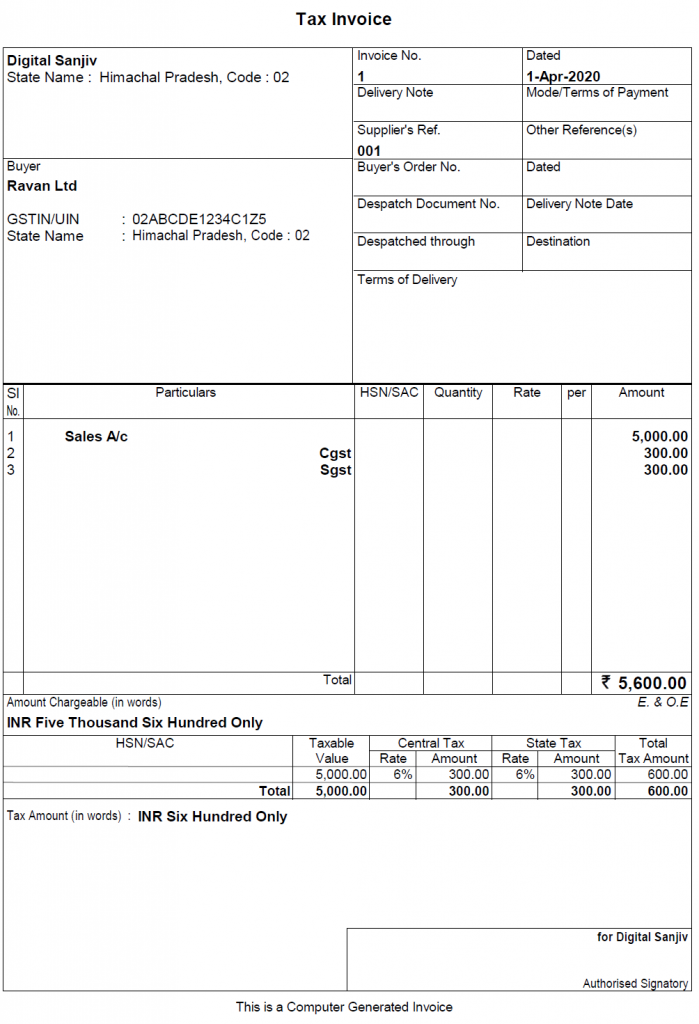
The following is a sample preview screen of the Accounting GST invoice.
Item GST Invoice for Goods and Services
Now let us see how to how to print a item invoice. In item invoice stock items are involved . while accounting invoice was pure accounting one but in case of item invoice inventory is involved and respectively stock items get reduced as sale is made.
- From Gateway of Tally > select the accounting Voucher > Press F8 key to select the sales voucher >
- Press the Alt+i keys or alternatively you can click on the Item Invoice on the button bar on the right side of the tally window.
- select the appropriate reference no, Party name and fill all the additional details as per actual situation
- Select the Sales ledger , Item name, Quantity and Rate the amount will be automatically calculated . Enter more items is needed. Press enter key twice and press spacebar to select CGST and SGST.
- To Print press Alt+P and preview will look like this.

Item GST Invoice

Print Sales Invoice with Additional Details
When you make a sale, you will need to hand over a printed copy of the invoice. Depending on your business policy or buyers’ preferences, you may want to change the title of the invoice, use the company logo, or even set the print size for the invoice. You may need to print your company’s bank details, the declaration or terms and conditions of sales, marks or container numbers for exports. Also, you may want to print the invoice as a Performa invoice. Tally.ERP 9 covers all such printing preferences.
Change GST invoice title
If you want to change the title, say Sales Invoice to Cash Memo, or even the subtitle of the sales invoice before printing it, you can do so in Tally.ERP 9.
- In the sales invoice, press Alt + P (Print) > F12 (Configure).
- In Title of Document , enter the required title.
- Accept the screen. As always, you can press Ctrl + A to save.
Henceforth, all the sales invoices that you print will continue to have the same title/subtitle, until you change it in F12 (Configure) for invoice printing.
The title you have specified will appear on the top of the printed invoice. If you have used a subtitle, it will appear below the title.
Print Company’s Bank Details
When you have to share your bank details with the customers for making sales bill payments directly to your bank account, you can print the same in the sales invoice. In case, you need to provide the bank details on a need basis, you can select the bank name while printing the invoice. If you need all the payments to be made to a bank account, you can specify the bank details in the party master, and use the same as default to print in your invoice.
Print bank details in sales invoice
- In the sales invoice, press Alt+P (Print) > F12 (Configure) > set Print bank details to Yes .
- Select the Bank Name and press Enter . The bank details will be saved for printing in the invoice.
The details of the selected bank will be printed in the invoice.
Change Declaration/Terms & Conditions in GST Sales Invoice
If your business policy has defined terms and conditions related to the sales of goods and services, and you want to print them in your invoice, you can do so in Tally.ERP 9.
- Enable the sales voucher type to print declaration.
- Gateway of Tally > Accounts Info. > Voucher Types > Alter > Sales .
- Set/alter declaration under Printing – Yes .
- Change the declaration as needed. Use Ctrl+Enter to break lines for multi-line entry.
- Print the declaration in sales invoice.
- In the sales invoice, press Alt+P (Print) > F12 (Configure) > set Print Declaration to Yes .
Set GST invoice print size to use less paper space for printing
By default, Tally.ERP 9 prints invoices on A4 size papers. In certain cases, your transaction may involve only a few items and can be printed in less paper space. In such cases, you can reduce the print size for your invoice and use papers of only the required size for printing.
Note: Printing invoices as per the print size and paper size will depend on the printer you use.
- In the sales invoice, press Alt + P (Print) > F12 (Configure) > Press F12 for more options .
- Height of normal invoice (inches) : By default, the standard height is set to 10 inches for an A4 size paper. If your invoice requires only half the size, change the height to 5 inches.
What you see on the screen can vary based on your choices. Press F11 (Features) to enable or disable features.
- Accept the screen. As always, you can press Ctrl + A to save.
Henceforth, all the sales invoice you print will continue to have the same print size, until you change the option in F12 (Configure) for GST invoice printing.
- If your printer’s tray contains A4 size papers, replace it with papers of the size appropriate for printing. For example, to print an invoice of the height 5 inches, use A5 size papers.
- In the Voucher Printing screen, press Enter to print the invoice on the paper used.
Similar Posts:
Voucher Entry in Tally.ERP 9 Part-1/2, Update GST for Stock Items and Groups, Create, Alter, Delete a Ledger in Tally.9 ERP
PS: Tally.ERP9 is a comprehensive software by Tally Solutions, Simple easy to use, It is best suited for Accounting, Inventory and Payroll management and fully complaint with Goods and Services Tax.
[sg_popup id=”256″ event=”inherit”][/sg_popup]
Pingback: Discounts in Sales Invoices in Tally.ERP9 - DigitalSanjiv Digital Learning
Pingback: Multiple GST and Interstate Sales invoice - DigitalSanjiv
Pingback: Order Processing in Tally.ERP 9 - DigitalSanjiv
Pingback: Multiple GST and Interstate Sales invoice - DigitalSanjiv
Pingback: Accounting Fundamentals for Beginners 2026 Guide with Examples
Pingback: Top 25 Tally Prime Shortcut Keys Every Accountant Must Know