

Charts of Accounts in Tally Prime
Table of Contents
Updated April 2026
If you are learning Tally Prime, understanding Charts of Accounts is the first and most important step. Without this, you cannot properly record transactions or generate reports like Profit & Loss and Balance Sheet.
In this guide, you will learn:
- What is Charts of Accounts
- How to create ledgers in Tally
- Practical examples
- Common mistakes
- Career scope after learning Tally
👉 This guide is specially designed for beginners + job seekers in India
What is Charts of Accounts in Tally Prime?
Charts of Accounts is a complete list of all accounts (ledgers and groups) used in a business.
👉 In simple words:
It is a structured system that organizes all financial transactions.
It includes:
- Ledgers
- Groups
- Sub-groups
👉 All reports in Tally depend on this structure.
Types of Accounts in Tally Prime
In Tally, accounts are classified into four main categories:
Type | Meaning | Example |
|---|---|---|
Assets | What business owns | Cash, Furniture |
Liabilities | What business owes | Loan, Creditors |
Income | Earnings | Sales, Commission |
Expenses | Spending | Rent, Salary |
👉 This classification is the backbone of accounting.
How to Create Company in Tally Prime (Step-by-Step)
Before creating accounts, you must create a company.
Steps:
- Go to Gateway of Tally
- Click on Create Company
- Enter:
- Company Name
- Address
- State (mandatory)
- Financial Year
- Verify currency
- Press Ctrl + A to save
👉 After this, you can start recording transactions.
What is Ledger in Tally Prime?
A ledger is where all transactions related to an account are recorded in an organized way.
👉 Example:
- Cash A/c
- Salary A/c
- Rent A/c
👉 In simple terms:
Ledger = Final record of transactions
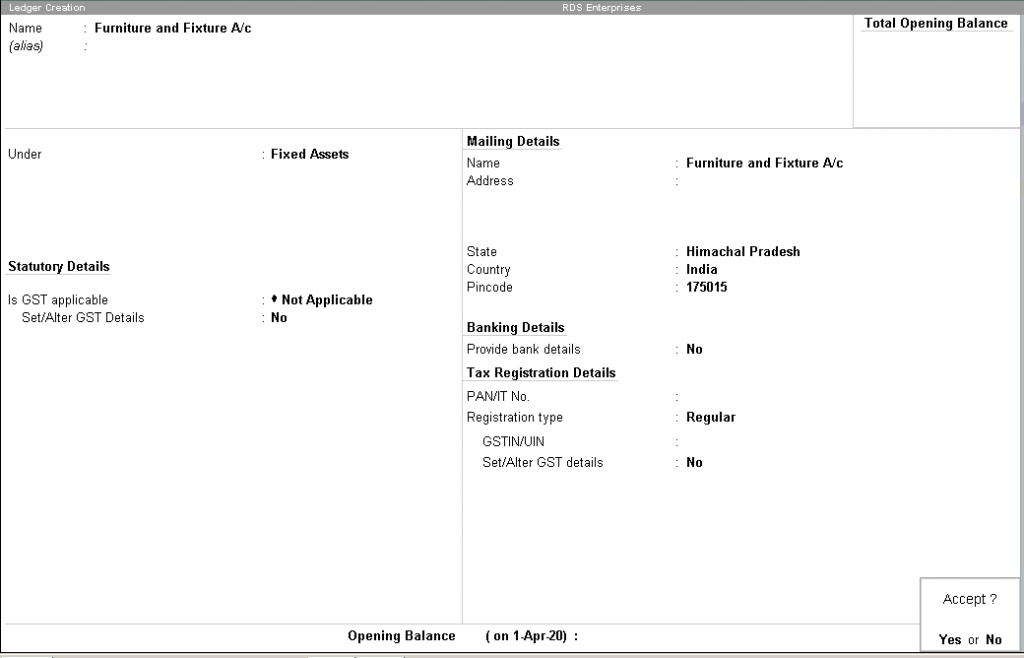
How to Create Ledger in Tally Prime
Method 1: Direct Creation
- Gateway of Tally → Create → Ledger
- Enter:
- Ledger Name (e.g., Rent A/c)
- Group (e.g., Indirect Expenses)
- Enter opening balance (if any)
- Press Ctrl + A
Method 2: During Voucher Entry (Practical Method)
- While entering voucher
- Press Alt + C
- Create ledger instantly
👉 This is commonly used in real office work.
Types of Ledgers in Tally Prime
🔹 Asset Ledgers
- Cash
- Bank
- Furniture
🔹 Liability Ledgers
- Loan
- Creditors
🔹 Expense Ledgers
- Rent
- Salary
- Electricity
🔹 Income Ledgers
- Commission
- Interest
🔹 Tax Ledgers (GST)
- CGST
- SGST
- IGST
👉 Tax ledgers are created under Duties & Taxes
Practical Examples of Ledger Creation (Very Important)
Ledger Name | Group |
|---|---|
Rent A/c | Indirect Expenses |
Salary A/c | Indirect Expenses |
Furniture | Fixed Assets |
CGST | Duties & Taxes |
Predefined Ledgers
All ledgers have to be classified into groups. These groups and ledgers are classified into profit and loss or balance sheet.
There are two pre-defined ledgers in TallyPrime:
| Cash ledger | Profit and loss account |
|---|---|
Cash Ledger | Profit and Loss Ledger |
The cash ledger is grouped under cash-in-hand. | The profit and loss account ledger is grouped under primary. |
You can enter the opening balance as on the day the books begin. | The previous year’s profit or loss is entered as opening balance of the ledger. The balance entered is the opening profit/loss. |
This ledger can be altered and deleted. | This ledger can’t be deleted but it can be modified. |
👉 These examples are frequently asked in interviews.
Charts of Accounts Example (Real Business)
Let’s understand with a small shop example:
Business: Mobile Shop
Ledgers:
- Cash A/c → Asset
- Purchase A/c → Expense
- Sales A/c → Income
- Rent A/c → Expense
- GST → Tax
👉 This structure helps generate:
- Profit & Loss
- Balance Sheet
Important Tally Shortcut Keys
Shortcut | Use |
|---|---|
Alt + C | Create Ledger |
Alt + G | Go To |
Ctrl + A | Save |
F11 | Features |
👉 Knowing shortcuts improves efficiency in jobs.
Tally Interview Questions
What is Ledger in Tally?
Ledger is the record where all transactions of an account are stored.
What is Charts of Accounts?
It is the list of all accounts used in a business.
Why is grouping important?
It helps in generating correct financial reports.
Common Mistakes Beginners Make
- Selecting wrong group
- Incorrect GST setup
- Duplicate ledger creation
- Ignoring accounting rules
👉 Avoid these mistakes to become job-ready faster.
Why Charts of Accounts is Important?
It helps in:
- Accurate accounting
- GST compliance
- Financial reporting
- Business decisions
👉 Without proper setup, reports will be wrong.
Career Scope After Learning Tally Prime
After learning Tally with GST, you can apply for:
- Accountant
- Billing Executive
- GST Executive
- Office Assistant
Salary in India (2026)
Experience | Salary |
|---|---|
Fresher | ₹10,000 – ₹18,000 |
1–3 Years | ₹18,000 – ₹35,000 |
3+ Years | ₹35,000 – ₹60,000 |
👉 Practical knowledge = faster growth
Want to Learn Tally Practically?
If you want a job-oriented Tally course, practical training is very important.
We provide:
- Tally Prime + GST training
- Real business examples
- Practical assignments
- Placement support
📞 Call Now: 9882027366
💬 WhatsApp for Demo Class
👉 Start your career with the right skills.
Final Thoughts
Charts of Accounts is the backbone of Tally Prime accounting. If your basics are strong, you can easily learn advanced topics and get a job in accounting.
👉 Focus on:
- Practice
- Real examples
- Understanding groups
That is the key to success.
Frequently Asked Questions (FAQs)
Is Charts of Accounts important in Tally?
Yes, it is the foundation of accounting.
Can I get job after Tally course?
Yes, especially with practical training.
Is Tally easy to learn?
Yes, with proper guidance and practice.
What is the use of ledger?
It records all transactions related to an account.
TallyPrime installation setup files can be downloaded from the Tally Solutions website.
Charts of Accounts is very basic topic in Tally Prime. Most of the basic ledgers has been discussed in brief. Please like and share the topic.
Similar Topics:
TallyPrime Download and Installation
You May Also Like:
- Object Oriented Programming Features
- Dynamic Memory Allocation in C
- How To Enable JavaScript in Browsers
- What is New in HTML5
What are 3 Basic Types of Accounts in Accounting?
2 Real Account – Accounts related to Assests, Properties or possesions. It can be Both Tangible or intangible. e.g Furniture, Cash Etc.
3 Nominal Account -Accounts related to Income, Expenses, Losses or Gains. e.g – Rent, electricity Bill, Commission Received/Paid.
What are 3 Golden Rules in Accounting ?
Debit the Receiver, Credit the Giver.
2 Accounting Rule for Real Account
Debit what comes in , Credit what goes out.
3 Accounting Rule for Nominal Account
Debit All Expenses and Losses, Credit All Incomes and Gains
Pingback: Features of Java - DigitalSanjiv